![]()
![]()
![]()


- E-mail: info@clipinhair.ae
- Customer: login
- Cart: empty
-
Verified shop
with no risk -
All in stock
24hours dispatch -
Express shipping
worldwide -
Quality guarantee
100% human hair -
Exchange or return
within 14 days -
E-mail
info@clipinhair.ae
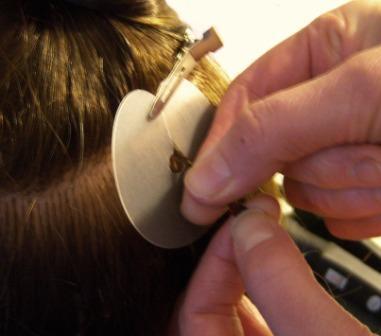
How to apply 100% human hair extension
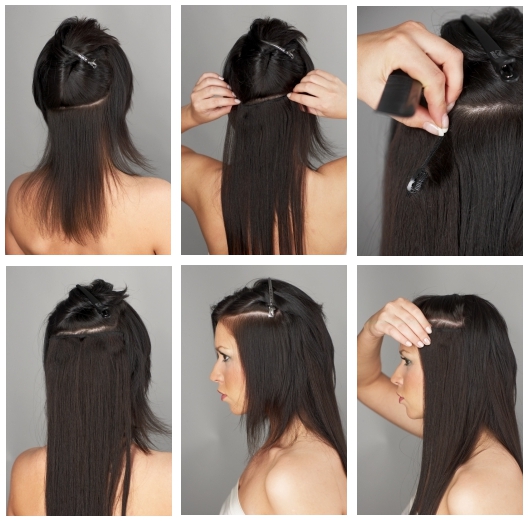
Clip in hair extensions
Clip In Hair Extensions are perfect for those women looking for a quick do-it-yourself hair extensions method with no permanent bonding.
Clip In Hair Extensions can be applied in less then 5 minutes in the comfort of your own home, without any help from a hair stylist.
1. Before applying your clip in extensions, practice opening and closing the clips by applying pressure to each side of the clip with your thumbs.
2. Using your index fingers or a tailcomb, make a clean horizontal part across your scalp about 1 inch from the nape of your neck. Secure your hair that is above the part using a claw clip or hair tie.
3. Make sure all clips on the hair weft are in the open position.
4. Always attach the middle clip first. Slide the comb on the clip onto your natural hair and snap shut. Check if the attachment is securely in place. Repeat with the clips on the left and right side of the weft.
5. Make sure the weft lies flat along your scalp and feels secure.
6. Release the clipped hair above the part and use a comb to make another horizontal part ? to 1 inch above the previously applied extension. Once again, clip your natural hair that is above the part out of the way.
7. Attach another weft in the same manner as the first. Remember to always attach the middle clip first.
8. Continue making horizontal parts and attaching the extensions as you move up the back of the head.
9. Attach the smaller side pieces by making a horizontal part above the ear and attaching the clip in wefts in the same manner.
10. Use a mirror to make sure no visible weft is showing. Done! You can now use a hair straightener or curling iron to style your hair extensions.
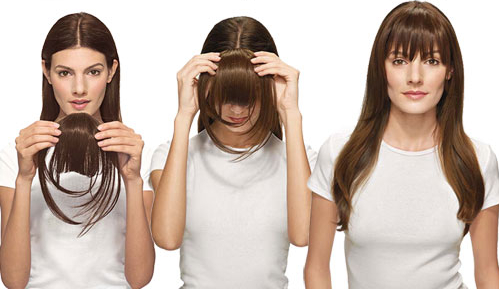
Clip in bangs
Since everyone has a different size forehead, the clip-on bangs are 6" long. You will need to have them cut to the length and shape you desire.
Step 1:
Snip off the tag so it doesn't get in your way or show when worn. Wet the entire piece and comb straight. Unsnap the comb by bending up on the edges.
Back-comb (tease, rat) your own the hair where the clip will attach in the front bang area. Slide the clip under the back-combed hair and snap shut by bending the edges back down. Additional bobbie pins or toupee tape may be used to help secure piece if it feels loose. Most people find it stays quite well with just the one clip once the bangs are cut.
Step 2:
Make sure to clip the piece about 1 or 2 inches from the front hairline. The hair will be too long and hang into your face until it is cut the right length.
Resist the temptation to clip it back farther in order to "shorten" the bangs. This is incorrect and will make the bangs look thin and sparse.
Step 3:
Loosely hold hair and trim hair to length desired. Do not pull them down tight or they will be shorter than you want them when they bounce back up. Also, wet bangs will shrink when dry, so leave them longer than you think they should be.
If you are unsure, have them cut by a professional stylist.
Step 4:
Fan out and style as you would your own bangs. Since the pieces are human hair, curling or flat irons, rollers, blow dryer, hair spray, etc. may be used.
Once they are cut to desired length, they are easy to reuse, over and over. It only takes a few seconds to clip them on and off.
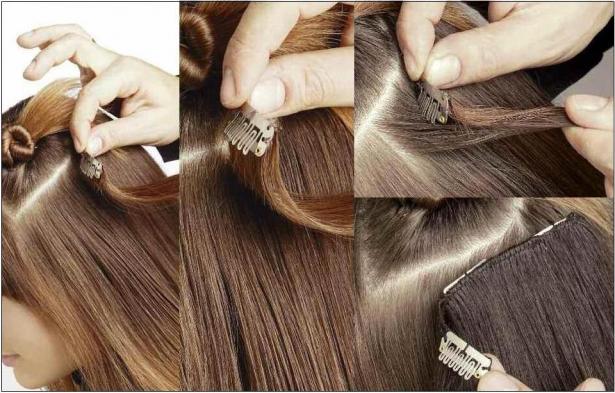
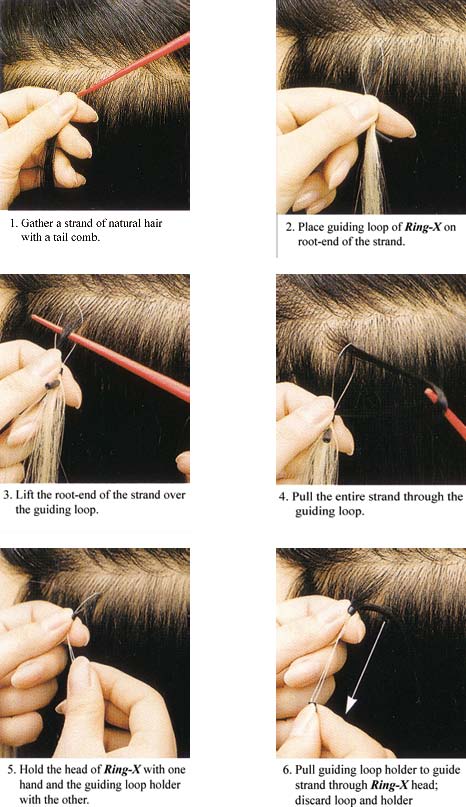
Micro ring/micro loop/easy ring/easy loop hair extensions
Here is a step by step guide on how to apply Easy Loop Micro Ring hair extensions:
1. Section your hair across the back using a comb ensuring you make a clean line. Clip your remaining hair up out of the way.
2. Take a small section of your natural hair (about the same amount as the hair on the loop strand) and twist it to make handling easier. Pick up an Easy Loop strand and place your natural hair through the white plastic loop.
3. Working close to the scalp, pull the plastic loop tab from the bottom and keep pulling until your natural hair is threaded through the micro bead. The white loop should now be completely free from the micro bead. We suggest keeping these incase you need to re-apply any of the strands at a later date.
4. Move the extension strand towards you scalp (not too close though, please leave enough to give a little free swing). Hold the extension hair downward, take a pair of pliers and clamp down very firmly on the micro bead. Make sure the bead lies flat against your head.
5. Complete the row, unclip your hair and make another section a little above the first. Clip up the hair again, and work on your second row. Remember to stay in a little all the way around the hairline. By doing this you will have enough natural hair left around the hair line to cover the micro beads should you wish to wear your hair up.
6. Continue inserting Easy Loop hair extensions in rows until you have put in enough extension strands to give you the look you are after.
Done! Beautiful long hair applied at home in one or two hours.
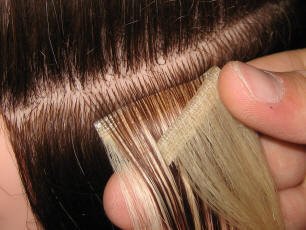
Tape in/PU extensions/tape hair/hair talk hair extensions
Tape hair extensions are thin rows of hair that lie flat to your head.
- Suitable: Thin to normal hair
- Maintenance: Every 4-6 weeks
- Time: Approximately 30 min – 120 min
There is the sandwich method used in the application of tape hair extensions. With the sandwich method you take a section of your natural hair and apply one weft above it and one weft below it, effectively sandwiching your natural hair between the two wefts. This method is great for adding volume and can work out to be more longer lasting but it can be slightly tricky to get the application just right.

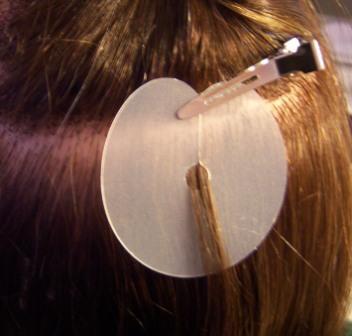
Nail tip hair extensions
Always wash your hair before you start, but do not use conditioner as the extensions will not adhere properly if your hair is too slippery.
Take a small section of your own hair about the same size as the extension you are about to apply.
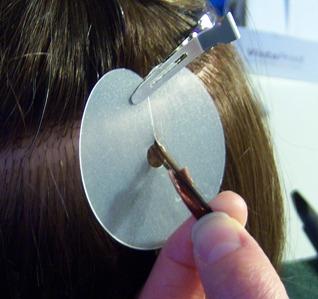
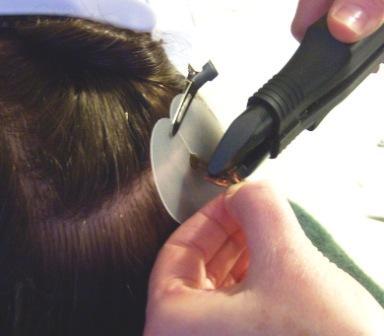
Wrap the glue tip of the pre bonded extension around this section of hair around 1cm away from the scalp and apply heat for a few seconds.
Roll the heated glue tip between your fingers to make a smooth strong rice shaped bond.
Continue working in rows to complete your desired style.
Remember to work in a brick work (staggered) fashion on the rows to create a more natural lay to the hair.
Remember not to use conditioner or hair serums before applying hair extensions.
Clip in ponytails / wraps
Its hair extansion made for everyday use!
The application takes just about 2 minutes and you can do it all alone without someone's help.
It's basically a strip of hair sewn together. In their upper part is a small "clip", which is inserted into your short ponytail. Then you separate long thin strip of hair, which you wrap aroundyour small ponytail and easily secure with a clasp. This kind of hairstyle perfectly holds all day long without need of any adjustments.
-
Clip in hair
-
 Clip in hair extesions 16 inch (40cm) - straight
-
 Clip in hair extesions 16 inch (40cm) 100g - straight
-
 Clip in hair extensions 20 inch (50cm) - straight
-
 Clip in hair extensions 24 inch (60cm) - straight
-
 Clip in hair extensions 28 inch (70cm) - straight
-
 Clip in hair extesions 20 inch (50cm) - wavy
-
 Clip in hair extensions 20 inch (50cm) - curly
-
 Clip in human hair streaks 20 inch
-
 CLIP IN human hair extensions Deluxe
-
 Clip in human hair bangs / fringes
-
 Clip in deluxe package
-
 Clip in according to colour shade
-
 Hair extension according to length hairpiece
-
 Hair extension according to weight hairpiece
-
- Clip in wefts
- Clip in ponytails
-
Tape hair
-
 Tape IN / Tape Hair Extensions 16 inch (40cm)
-
 Tape IN / Tape Hair Extensions 20 inch (50cm)
-
 Tape IN / Tape Hair Extensions 24 inch (60cm)
-
 Tape IN / Tape Hair Extensions 20 inch (50cm) wavy
-
 Tape IN / Tape Hair Extensions 24 inch (60cm) wavy
-
 Tape IN / Tape Hair Extensions 20 inch (50cm) curly
-
 Tape IN / Tape Hair Extensions 24 inch (60cm) curly
-
 Invisible Tape in - Remy AAA 50cm
-
-
Micro ring hair
-
 Micro ring human hair extensions 16 inch (40cm)
-
 Micro ring human hair extensions 20 inch (50cm)
-
 Micro ring human hair extensions 24 inch (60cm)
-
 Micro ring human hair extensions 20 inch (50cm) wavy
-
 Micro ring human hair extensions 24 inch (60cm) wavy
-
 Micro ring human hair extensions 20 inch (50cm) curly
-
 Micro ring human hair extensions 24 inch (60cm) curly
-
-
Nail tip hair
-
 Nail tip / U tip hair extensions 16 inch (40cm)
-
 Nail tip / U tip hair extensions 20 inch (50cm)
-
 Nail tip / U tip hair extensions 24 inch (60cm)
-
 Nail tip / U tip hair extensions 20 inch (50cm) wavy
-
 Nail tip / U tip hair extensions 24 inch (60cm) wavy
-
 Nail tip / U tip hair extensions 20 inch (50cm) curly
-
 Nail tip / U tip hair extensions 24 inch (60cm) curly
-
- Accessories
- Supplements
Free bonus
Extra gift in total value 16 USD
For every order over 40 USD.
Clipinhair on Facebook
Clip in before and after
Clip in apply
Accepted cards

Share us
![]()
![]()
Copyright © 2024 Clipinhair.ae. All right reserved • Webdesign - Broucek-a-beruska.cz